 Save
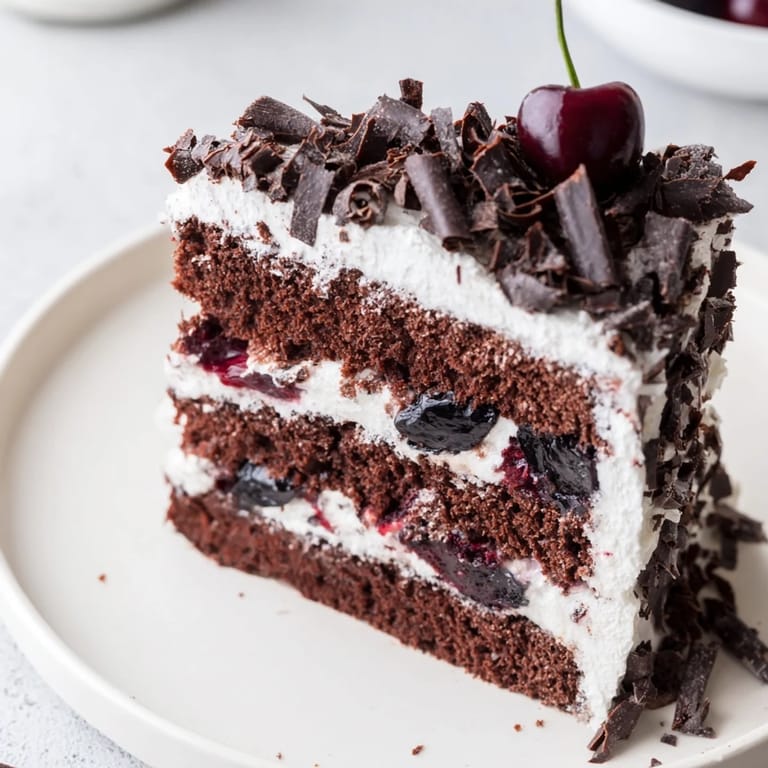
Save The first time I attempted Black Forest Cake, I was standing in a Austrian bakery watching a baker layer impossibly thin cake rounds with practiced ease, and I thought, I have to learn this. What looked like untouchable elegance—those glossy cherries peeking through clouds of cream, the chocolate shavings catching the light—turned out to be more forgiving than I imagined. That day changed how I thought about fancy desserts; they don't require restaurant equipment, just patience and a willingness to let the flavors speak.
I made this cake for my partner's birthday, and watching them take that first bite—eyes closing, that small smile—suddenly made sense why this dessert has survived generations. The boiling water batter seemed wrong to me at first, but it creates this impossibly moist crumb that doesn't dry out even after hours of sitting with the cream. That moment taught me that recipes that feel unconventional often exist that way for a reason.
Ingredients
- All-purpose flour: Use it unsifted if you prefer a denser crumb, though sifting gives you that tender bakery texture.
- Unsweetened cocoa powder: Dutch-process makes the cake taste richer and more sophisticated; don't skip this quality detail.
- Baking powder and baking soda: This combination lifts the cake while the boiling water keeps it moist, a technique that transforms the texture.
- Eggs, milk, and oil: Room temperature ingredients blend smoothly without streaking; cold milk can cause lumps.
- Boiling water: It blooms the cocoa and thinens the batter so the cake stays tender and absorbs the cherry syrup beautifully.
- Dark sweet cherries: Jarred in light syrup works perfectly and saves the work of pitting; taste the syrup first to ensure it's not overly sweet.
- Kirsch (cherry brandy): Optional but worthwhile; it adds an almost floral depth that makes people wonder what the secret ingredient is.
- Heavy whipping cream: Must be genuinely cold or it won't whip to stiff peaks; chill your bowl and beaters too.
- Dark chocolate: Use something you'd actually eat; cheap chocolate makes disappointing shavings and tastes thin.
Tired of Takeout? 🥡
Get 10 meals you can make faster than delivery arrives. Seriously.
One email. No spam. Unsubscribe anytime.
Instructions
- Prepare your pans and preheat:
- Grease two 8-inch round pans and line them with parchment paper cut to fit the bottom; this prevents sticking and makes turning out the layers foolproof. Oven at 350°F (175°C) means the cake bakes evenly without overdrying.
- Build the dry mixture:
- Sift flour, sugar, cocoa powder, baking powder, baking soda, and salt together into a large bowl, breaking up any lumps in the cocoa. This distributes the leaveners evenly so the cake rises uniformly.
- Combine wet ingredients and blend:
- Add eggs, milk, oil, and vanilla to the dry mixture and beat for about a minute until the batter is smooth and no streaks of flour remain. The batter should look thick but pourable at this point.
- Add the boiling water carefully:
- Gradually stir in boiling water—the batter will look dangerously thin and almost soupy, but this is exactly right. This liquid creates steam during baking, which keeps the cake impossibly moist and tender.
- Bake until a toothpick signals doneness:
- Divide batter evenly between pans and bake 30 to 35 minutes; a toothpick inserted in the center should come out with just a few moist crumbs, not wet batter. The cake will keep cooking slightly as it cools, so don't overbake.
- Cool the layers properly:
- Let cakes cool in the pans for 10 minutes (they firm up enough to handle), then turn them out onto wire racks to cool completely. Trying to assemble warm cake is heartbreak waiting to happen.
- Prepare the cherry filling:
- Combine pitted cherries, cherry juice, and sugar in a small saucepan and bring to a gentle simmer, then stir in a cornstarch slurry (cornstarch mixed with cold water) to thicken it. Cook for 2 to 3 minutes until the mixture coats the back of a spoon, then remove from heat and cool completely.
- Whip the cream to stiff peaks:
- Beat cold heavy cream, powdered sugar, and vanilla in a chilled bowl until stiff peaks form—this takes 3 to 5 minutes depending on your mixer. Overbeat even slightly and you're edging toward butter, so watch it carefully.
- Slice the layers horizontally:
- Using a serrated knife and a gentle sawing motion (not pressure), carefully slice each cooled cake layer in half horizontally to create four layers. A turntable makes this easier, but a steady hand and patience work too.
- Layer with intention:
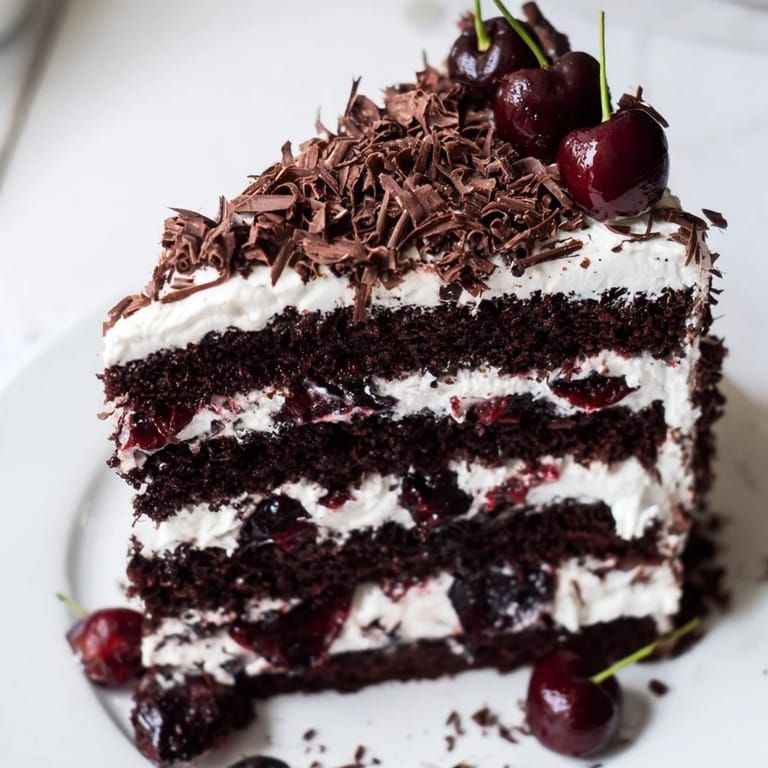
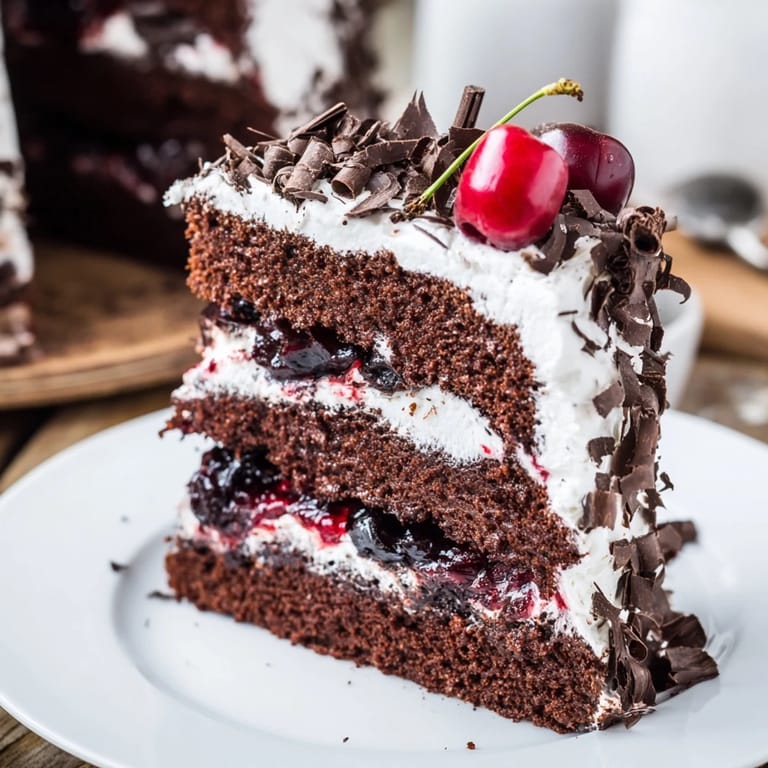
- Set the first layer on your serving plate, brush it lightly with cherry syrup (not too much or it gets soggy), then spread a layer of cherry filling, then a layer of whipped cream. Repeat with the remaining layers, placing the final layer flat side up and topping with whipped cream on the surface and around the sides, using an offset spatula to make it smooth and beautiful.
- Finish with chocolate and cherries:
- Use a vegetable peeler to create chocolate shavings from a cold chocolate bar, letting them fall randomly across the top, then garnish with fresh or maraschino cherries. Chill for at least an hour before serving so the layers set and flavors meld together.
 Save
Save What moves me most about this cake is how it transforms a kitchen into something special. The smell of chocolate and cherries fills the air, the layers stack into something that looks impossible, and suddenly the person eating it feels celebrated. That's when I understood why Black Forest Cake has endured—it's not just dessert, it's an edible love letter.
Why This Cake Deserves a Place in Your Rotation
Black Forest Cake seems intimidating until you make it once, and then you realize you've been scared of something that's actually quite kind to home bakers. The boiling water technique guarantees moisture, the filling comes together in minutes, and the only real skill required is patience during assembly. I've made this cake at least thirty times now, and it still impresses people every single time, which feels like the definition of a recipe worth keeping.
Make-Ahead and Storage Guidance
This cake actually improves if you assemble it a day ahead and let it chill overnight—the layers settle, the flavors marry together, and it becomes easier to slice cleanly. You can bake the cake layers and freeze them for up to two weeks, or make the filling and whipped cream separately and assemble everything on the morning you plan to serve it. Just don't frost it until a few hours before serving if your kitchen is warm, or the cream can soften in the heat.
Variations and Personal Touches
The beauty of this recipe is that it welcomes small changes based on what you love. If you can't find good fresh cherries, jarred sour cherries in light syrup are traditional and often better than whatever fresh cherries are shipping across the country in winter. Some people brush the layers with a simple sugar syrup infused with kirsch or cherry juice instead of just syrup, which adds another layer of flavor. I've seen bakers add a thin layer of chocolate ganache between some of the cream layers for extra richness, though that pushes the cake toward very decadent territory.
- For an alcohol-free version, simply omit the kirsch and use extra cherry syrup or juice for brushing the layers.
- If you're working in a hot kitchen, assemble the cake closer to serving time and keep it chilled until the last moment.
- Leftover chocolate shavings keep in an airtight container and can be sprinkled on ice cream, coffee, or any dessert that needs a little elegance.
 Save
Save Make this cake when you want to feel like both a baker and a magician. It asks for attention but rewards it generously, and the faces of people eating it make every minute of work feel worthwhile.
Recipe Questions & Answers
- → How do I achieve moist chocolate layers?
Use a combination of oil and milk in the batter, and add boiling water gradually to achieve a light, moist texture.
- → Can fresh cherries be substituted with jarred ones?
Yes, jarred sour cherries in light syrup can be used for a traditional flavor without compromising taste.
- → What is the purpose of brushing cherry syrup on cake layers?
Brushing cherry syrup adds moisture and intensifies the cherry essence between layers, enhancing the overall flavor balance.
- → How to make stable whipped cream for layering?
Use cold heavy cream and powdered sugar. Whip on high speed until stiff peaks form to ensure it holds shape during assembly.
- → Any tips for easy chocolate shavings?
Use a vegetable peeler on chilled dark chocolate bars to create fine, delicate shavings quickly and evenly.