 Save
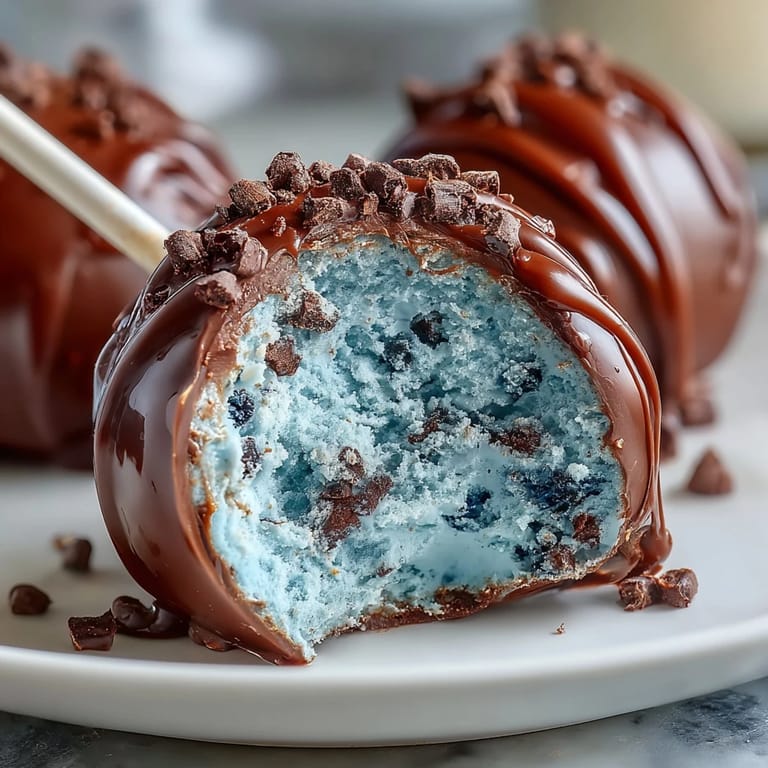
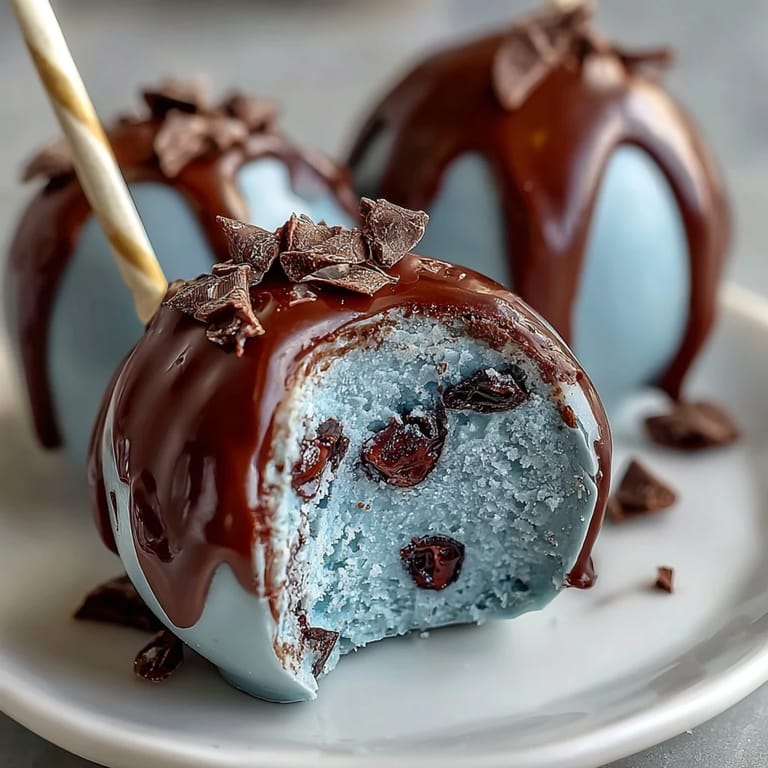
Save My sister called me in a panic two days before Easter, asking if I could whip up something special for her brunch spread. I'd never made cake pops before, but the image of robin's egg blue confections immediately popped into my head—something about the color just felt right for spring. That afternoon, I discovered the oddly meditative rhythm of rolling cake balls while humming along to the radio, each one perfectly round under my flour-dusted palms.
When I lined those finished cake pops on my sister's dessert table, three kids immediately gravitated toward them like they were treasure, carefully choosing one and turning it over in their hands to admire the speckles before taking a bite. That moment taught me that sometimes the most impressive desserts are the ones you can hold in your hand and eat in two bites.
Ingredients
- 1 box vanilla cake mix: This is your foundation—don't feel pressured to bake from scratch unless you want to, because the convenience here means more time perfecting the coating and design.
- 1/2 cup unsalted butter and 1 1/2 cups powdered sugar: The frosting should taste good on its own, so taste as you go and don't skimp on vanilla extract.
- 12 oz white candy melts or white chocolate: Candy melts are more forgiving for beginners, but real white chocolate will give you a richer flavor if you're comfortable with the slightly pickier melting process.
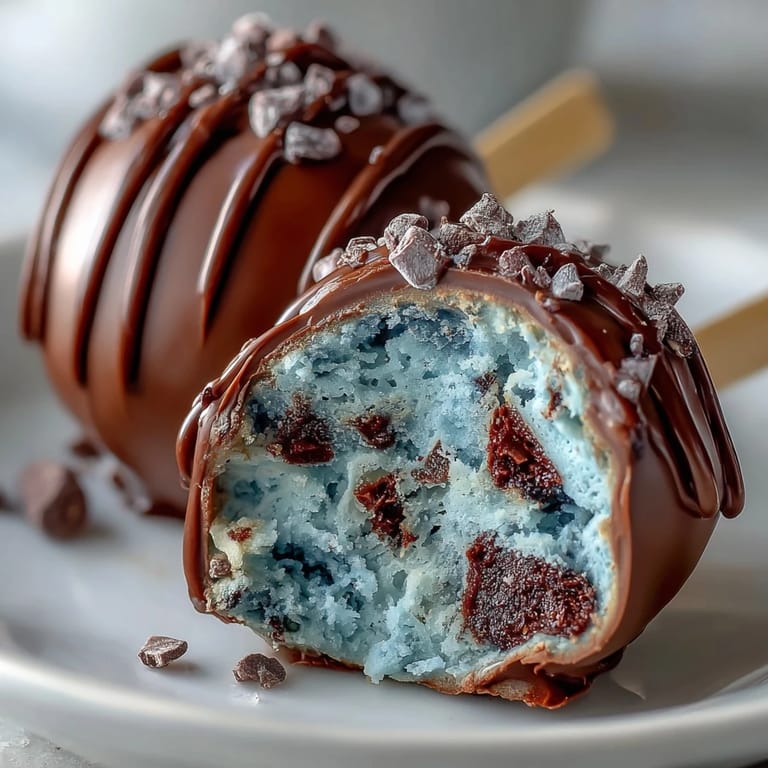
- Blue gel food coloring: Oil-based is non-negotiable here—water-based coloring can cause the chocolate to seize up and become grainy, which I learned the hard way on my first try.
- Cocoa powder and vodka: The vodka evaporates quickly and won't leave your cake pops soggy, which is why it's better than water for creating those delicate speckles.
- 24 lollipop sticks and a Styrofoam block: These aren't optional—they're what transform your cake balls into actual cake pops and keep them standing upright while they set.
Tired of Takeout? 🥡
Get 10 meals you can make faster than delivery arrives. Seriously.
One email. No spam. Unsubscribe anytime.
Instructions
- Bake and cool your cake:
- Follow the box instructions, then let the cake cool completely on a wire rack—warm cake will fall apart when you crumble it, so this step is worth the patience.
- Make a frosting worth tasting:
- Cream the butter until it's pale and fluffy, then slowly add the powdered sugar so you don't create a cloud of powder in your kitchen. The mixture should feel light and spreadable, not dense.
- Crumble and combine:
- Break the cooled cake into fine pieces with your hands, then add frosting gradually—you're looking for a damp sand texture that holds together when squeezed but isn't wet. Too much frosting makes your cake pops heavy and dull.
- Roll your balls:
- Use a tablespoon measure for consistency, then roll each one between your palms until smooth. If the mixture feels too sticky, refrigerate it for 15 minutes before rolling.
- Freeze for structure:
- Those 15 minutes in the freezer are crucial—a firm cake ball won't disintegrate when you dip it in warm coating. This is the trick that separates a finished pop from a melted mess.
- Melt and tint your chocolate:
- Use low, steady heat or 20-second microwave bursts to keep the coating smooth and glossy. Add the blue coloring drop by drop, stirring well between additions so you hit that perfect robin's egg shade.
- Stick your pops:
- Dip the stick tip into melted coating first, then push it halfway into each ball and refrigerate briefly. This anchors the stick so it won't spin loose during the full dip.
- Give them their blue coat:
- Dip each pop quickly and decisively, then hold it upright for a moment to let excess drip off. The coating should be just thin enough to flow smoothly but thick enough to cover in one dip.
- Add the speckle magic:
- Mix cocoa powder with vodka until you get a paint-like consistency, then use a clean brush to flick the mixture gently across each pop. The speckles should look natural and scattered, like real eggshell markings.
- Let them set undisturbed:
- Give them at least an hour at room temperature, though overnight in the fridge is ideal if you have the time.
 Save
Save Later that Easter, my sister told me she'd made a second batch for herself because the first one disappeared too quickly. That compliment stuck with me more than any fancy dessert review ever could.
Flavor Variations to Try
Once you've nailed the basic technique, don't be afraid to play with the frosting—a teaspoon of lemon extract gives them a bright, unexpected tang, while almond extract creates an almost marzipan-like note that feels elegant. I've also swapped the vanilla cake for chocolate cake and kept the robin's egg blue coating, which creates a beautiful contrast and tastes deeply satisfying.
The Coating Matters More Than You Think
The difference between candy melts and real white chocolate is subtle but real—candy melts are more stable and forgiving, which is why I recommend them for your first batch. Real white chocolate gives you a richer, creamier bite, but it requires more careful temperature control and can seize if you're not gentle with it. Either way, adding a tablespoon of coconut oil or shortening makes the coating thinner and easier to work with without affecting the taste.
Storage, Display, and Make-Ahead Magic
These cake pops are actually better made a day or two ahead—the coating sets harder and the cake-to-frosting ratio mellows into something almost creamy. They'll keep at room temperature for three days in an airtight container, though I usually store mine in the fridge to extend their life to a week. For parties, arrange them in a vase filled with floral foam painted white, or stand them upright on a tiered dessert stand for maximum visual impact.
- Refrigerate overnight to let the coating set completely hard before stacking or packing them.
- If you need to transport them, place each one in a paper cupcake liner for stability and visual appeal.
- Make the cake and frosting up to two days ahead, then roll and dip them the day before serving.
 Save
Save Making these cake pops is less about following rules and more about enjoying the small details—the smell of vanilla cake warming your kitchen, the satisfying snap of hardened chocolate when you bite through. They're Easter magic you can hold in your hand.
Recipe Questions & Answers
- → What gives the coating its robins egg blue color?
Blue gel food coloring, preferably oil-based, is used to tint white chocolate or candy melts for a smooth, vibrant robins egg blue coating.
- → How do I achieve the speckled effect on the coating?
A mix of cocoa powder and vodka or clear extract is flicked lightly over the coated treats using a clean brush to create natural speckling.
- → Can these treats be made ahead and stored?
Yes, they can be stored at room temperature for up to 3 days or refrigerated for up to a week while maintaining freshness.
- → Is it possible to make these gluten-free?
Substitute the vanilla cake mix with a certified gluten-free version and ensure all other ingredients are gluten-free to accommodate dietary needs.
- → What is the purpose of adding coconut oil or shortening to the coating?
These help thin the melted coating, making it easier to dip and achieving a smooth, even layer over the cake balls.
- → How do I ensure the cake balls hold together properly?
Mix the crumbled cake with frosting gradually by hand until the mixture is moist but not sticky, then chill before shaping.